Chapter 18
Network Information System-共享系統檔案
I. Understanding NIS
(Network
Information System)
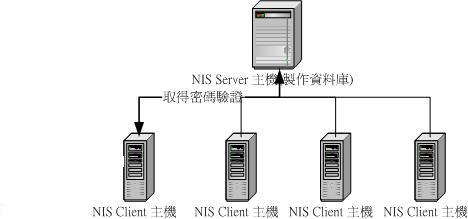
在設計網路服務時, 通常建議一部 Linux 主機專門進行一項服務。因此,一個公司內常會有好幾部 Linux 主機,有的負責 WWW 、有的負責
Mail 、有的負責 DNS的服務。雖然主機數量多了,但是因為在同一個公司裡,所以希望只要一組帳號與密碼就可以登入所有的 Linux 主機!
為了達成上述目標, 在Unix環境中, 設計了一個資訊系統, 這個資訊系統提供了一個共用資料庫, 在資料庫中存放著帳號及密碼等系統資訊,
當網域中的機器需要這些資訊時, 就可以向管理資料庫的伺服器查詢, 這個管理系統資訊的系統就叫做NIS( Network Information
System)。NIS的架構有如底下的圖示:
如上面圖示, 我們定義下列一些名詞:
-
NIS Domain
-
The group of computers that
the master NIS server supports is referred to as an NIS domain.
-
NIS
domain與DNS
(Domain Name Service)無關。T
-
NIS中同一domain的機器share同一組
Maps。
-
NIS
Client與
Server的contact可經由組態檔(/etc/yp.conf)強迫指定,亦可經由
廣播向網路詢問。
Network Information Service (NIS) 最早是由 Sun 這家公司所開發出來, 叫做Yellow Pages ( 簡稱
yp )的軟體系統, 所以現在人沿用這個名稱,也稱呼 NIS為 YP .
II. Setting
Up Red Hat Linux as an NIS Server & Client
套件安裝
基本上, NIS 建議直接使用原版光碟上面給我們的 RPM 來安裝即可!至少需要底下幾個套件才行:
- yp-tools :提供 NIS 相關的查尋指令功能
- ypbind :提供 NIS Client 端的設定套件
- ypserv :提供 NIS Server 端的設定套件
- portmap :RPC需要的輔助程式
你可以使用『 rpm -qa | grep yp
』來檢查是否真的有安裝這些套件!
Server 端設定:
NIS Server 主要以 ypserv
這個套件提供的資料來進行設定的,他主要的內容有:
- /etc/ypserv.conf :主要的設定檔了
- /usr/sbin/ypserv
:主要的服務(daemon)執行檔
- /usr/sbin/rpc.yppasswdd: RPC 的服務程式
- /usr/sbin/rpc.ypxfrd : RPC 的服務程式
- /usr/lib/yp/ypinit :建立 NIS 資料庫的執行程式
所以,我們最重要的就是設定 ypserv.conf 這個檔案!至於 RPC 的設定,直接啟動他即可!
另外,還有 yp-tools 會提供的相關資料:
- /usr/bin/yppasswd :更改你在 NIS database (NIS
Server 所製作的資料庫) 的密碼
- /usr/bin/ypchsh :同上,但是是更改 shell
- /usr/bin/ypchfn
:同上,但是是更改一些使用者的訊息
NIS Server 設定流程
在測試的系統當中,假定的網路狀況如下:
- 網域為 192.168.10.0/24
- NIS Server 的 IP 為 192.168.10.30,對應的主機名稱為
server.cluster
- NIS 的領域名稱設定為 cluster
在 NIS Server 端以 root 身份登入後,進行下面的工作:
- 啟動 portmap 並設定開機時啟動:
不論是 RPC Server 還是 RPC Client ,只要是 RPC 的相關服務要應用,通常要有 portmap
的輔助才行!所以,啟動並設定開機時啟動!
附註: RPC portmapper是一個伺服程式,它將 RPC 程式號碼轉換為 TCP/IP(或是 UDP/IP)協定的通訊埠號碼。
| [root@test root]# /etc/rc.d/init.d/portmap
start
[root@test root]# netstat -tl
Active Internet connections (only servers)
Proto Recv-Q Send-Q Local Address Foreign
Address State
tcp 0 0 *:sunrpc
*:* LISTEN
# 如果看到 sunrpc 的話,就表示啟動成功了!
[root@test root]# chkconfig --level 35 portmap on
# 上面這一行在設定 portmap 在 run-level 為 3, 5 的時候就開機時啟動!
|
- 啟動 time 與 time-udp :
由於portmapper 需要時間服務(Time service)。所以也必須要啟動time 與 time-upd!利用 xinet 這個 super
daemon 來進行啟動!
[root@test root]# vi /etc/xinetd.d/time
# 找到底下這一行:
disable = yes
# 將他改成
disable = no
# 儲存後離開
[root@test root]# vi /etc/xinetd.d/time-udp
# 同樣的將 disable = yes 改成 disable = no 即可!
disable = no
# 儲存後離開
[root@test root]# /etc/rc.d/init.d/xinetd restart
[root@test root]# netstat -utl
Active Internet connections (only servers)
Proto Recv-Q Send-Q Local Address Foreign
Address State
tcp 0 0 *:time
*:* LISTEN
tcp 0 0 *:sunrpc
*:* LISTEN
udp 0 0 *:time *:*
udp 0 0 *:sunrpc *:*
|
注意!至少要有上面四個 LISTEN 的 port 才行!分別是 UDP 與 TCP !
- 建立 NIS 的領域名稱 ( domainname )
1. 建立 NIS 的領域名稱
(這裡是設定為 cluster ):
[root@test root]# domainname###No Domainname
Set
[root@test root]# domainname cluster
[root@test root]# domainname
cluster
###domainname已設成cluster
2. 為了以後開機時, 能自動設定好domainname, 需要修改網路參數:
[root@test root]# vi /etc/sysconfig/network
# 加入底下這一行:
NIS_DOMAIN=cluster
|
- 設定 ypserv 的設定檔: ypserv.conf
這個設定檔的內容的主要語法為:
主要設定項目如下:
[root@test root]# vi
/etc/ypserv.conf
files: 30
# 這說的是『有多少資料庫檔案(database file)會被先讀進快取記憶體當中』
# 的意思,一般來說, 30 是已經很足夠的數值了,不需要更動他;
trusted_master: your.master.servers.name
xfr_check_port: yes
# 上面這兩個設定僅與 Master + Slave 架構有關,只有一部 NIS Server
的系統是用不到這兩個設定值
# 如果你的 NIS 是 slave 的架構,那麼需要指定一部 master 做為資料庫內容的
# 同步時候的主機,那就是 trusted_master 的設定內容!
# 如果沒有 master/slave 架構時,那就不需要 trusted_master 這個設定了!
# 至於 xfr_check_port 則是指定 master 與 slave 是否都要以 < 1024
# 以下的 port 來進行溝通的訊息!通常預設就是 yes ,不需要更動他!
# <主機名稱/IP>:<網域名稱>:<資料庫類別>:<安全性>
# 這個主要在設定安全性的方面,
# 這裡的設定應該是:先開放要開放的網域,然後全部都關閉!
# 各個相關的項目說明如下:
# 1. 主機名稱/IP:這裡可以這樣設定:192.168.1.0/255.255.255.0
# 2. 網域名稱:通常都設定成為 * 即可!
# 3. 資料庫類別:可以使用 * 來表示所有的資料庫!
# 4. 安全性:主要有三種參數:
# none :無論如何就是可以無條件進入本機;
# port :僅允許 < 1024 以下的 port 進入;
# deny :無論如何就是關閉不讓人家登入主機!
# 由於我是允許 127.0.0.0/255.0.0.0 以及
192.168.10.0/255.255.255.0 進入,
# 其他的都關閉!所以我可以這樣設定:
127.0.0.0/255.255.255.0 : * : * : none
192.168.10.0/255.255.255.0: * : * : none
* : * : * : deny
# 但是因為 /etc/shadow 裡面的檔案總不好讓人看到吧!而又由於 Linux
# 系統當中,只有 root 可以啟用 < 1024 以下的 port ,因此,更安全的設定,可以這樣做:
127.0.0.0/255.255.255.0 : * : * : port
192.168.10.0/255.255.255.0: * : * : port
* : * : * : deny
|
- 建立網路信任群組:
這個 /etc/netgroup 檔案可以記錄在我們網域裡面被信任的群,這個檔案的內容當中,每一行都有三個欄位,分別以逗號『,』隔開,意義為:
<host>,<user>,<domain>
主機,使用者帳號,領域名稱 |
如果這個檔案是『空的』的話,那麼代表著『全部的主機、帳號與領域名稱都接受』的意思,因為我們已經在 /etc/ypserv.conf
裡頭設定好了關於安全的項目了,所以這個檔案只要建立即可(本來是不存在的!):
| [root@test root]#
touch /etc/netgroup |
- 啟動 ypserv 及yppasswdd這個 daemon ,並且設定開機時啟動:
ypserv — This script
starts the ypserv (/usr/sbin/ypserv) daemon.
It reads information from the /etc/ypserv.conf
file to determine what to do. Then it listens for requests from NIS
client computers on the network.
yppasswdd — This script
starts the rpc.yppasswdd (/usr/sbin/rpc.yppasswdd)
daemon. This daemon handles requests from users on NIS client computers
who want to change their user passwords.
1. 啟動!
[root@test root]# /etc/rc.d/init.d/ypserv start
[root@test root]# /etc/rc.d/init.d/yppasswdd start
2. 觀察一下是否真的有動作?
[root@test root]# rpcinfo -u localhost ypserv
program 100004 version 1 ready and waiting
program 100004 version 2 ready and waiting
[root @test root]# rpcinfo -u localhost yppasswdd
program 100009 version 1 ready and waiting
# 這個 rpcinfo 就是在觀察與 RPC Server 有關的 program 目前的狀況!
# 因此可以用他來觀察你的 ypserv !
3. 設定開機時啟動:
# 你可以使用 ntsysv ,這裡我們使用 chkconfig !
[root@test root]# chkconfig --level 35 ypserv on
[root@test root]# chkconfig --level 35 yppasswdd on
|
- 製作資料庫、並重新啟動 ypserv 與 yppasswd :
NIS Server 主要是要提供資料庫給大家參考用的,當然要製作資料庫!然後,我們將這些資料庫讀入快取當中,所以資料庫製作完畢之後,一定要重新啟動
ypserv 與 yppasswdd 才行!
1. 製作資料庫:
[root@test root]# /usr/lib/yp/ypinit -m
At this point, we have to construct a list of the hosts
which will run NIS
servers. server.cluster is in the list of NIS server
hosts. Please continue to add
the names for the other hosts, one per line. When you
are done with the
list, type a <control D>.
next host to add:
server.cluster
next host to add: <==在這裡按下[ctrl + d]跳出
The current list of NIS servers looks like this:
server.cluster
Is this correct? [y/n: y] y
We need a few minutes to build the databases...
Building /var/yp/cluster/ypservers...
Running /var/yp/Makefile...
gmake[1]: Entering directory `/var/yp/cluster'
Updating passwd.byname...
Updating passwd.byuid...
Updating group.byname...
Updating group.bygid...
Updating hosts.byname...
Updating hosts.byaddr...
Updating rpc.byname...
Updating rpc.bynumber...
Updating services.byname...
Updating services.byservicename...
Updating netid.byname...
Updating protocols.bynumber...
Updating protocols.byname...
Updating mail.aliases...
gmake[1]: Leaving directory `/var/yp/cluster'
server.cluster has been set up as a NIS master server.
Now you can run ypinit -s server.cluster on all slave
server.
# 這個動作是每次修改使用者資料後一定要做的動作!,就是重新製作資料庫,
# 然後並且需要重新啟動 ypserv 與 yppasswdd !
2. 重新啟動服務:
[root@test root]# /etc/rc.d/init.d/ypserv restart
[root@test root]# /etc/rc.d/init.d/yppasswdd restart
|
這個動作是在 /var/yp 這個目錄當中,製作資料庫!請注意的是,每次在 NIS server 上面更動使用者的資料時,一定需要重新做這個步驟!
Client 端設定
NIS Client 需要的套件是:
相關的設定檔為:
- /etc/yp.conf :設定 NIS Server 的主機名稱與領域名稱
- /etc/hosts :至少需要設定 NIS server 主機 IP 對應的主機名稱
- /etc/passwd :指定需要查尋的是什麼
- /etc/nsswitch.conf :指定要使用什麼 daemon 查尋帳號與密碼
NIS Client 的設定流程
- 啟動 portmap 並設定開機時啟動:
不論是 RPC Server 還是 RPC Client ,只要是 RPC 的相關服務要應用,通常要有 portmap
的輔助才行!所以,啟動並設定開機時啟動!
| [root@client root]#
/etc/rc.d/init.d/portmap start
[root@client root]# netstat -tl
Active Internet connections (only servers)
Proto Recv-Q Send-Q Local Address Foreign
Address State
tcp 0 0 *:sunrpc
*:* LISTEN
如果看到 sunrpc 的話,就表示啟動成功了!
[root@test root]# chkconfig --level 35 portmap on
上面這一行在設定 portmap 在 run-level 為 3, 5 的時候就開機時啟動!
|
- 設定 NIS Server 的 IP 對應主機名稱:
請看上面 Server 設定之前的假設,我的 NIS Server 的 IP 與主機名稱記錄在 Client 端的 /etc/hosts 上面:
[root@client root]#
vi /etc/hosts
# 要有底下這一行!
192.168.10.30 server.cluster |
- 設定 NIS 的 domain 與 NIS 的主機:
NIS Server 與 Client 的 NIS domain 一定要相同:
1. 建立 NIS domain
name:
[root@client root]# domainname cluster
###若要開機時也能自動設定domainname, 請參考server端的做法.
[root@client root]# vi /etc/sysconfig/network
# 加入底下這一行:
NIS_DOMAIN=cluster
2. 建立 NIS 查尋的主機名稱
###如果這裡不指定, 系統將會以broadcast domainname的方式尋找
[root@client root]# vi /etc/yp.conf
# 加入這兩行:
domain cluster
ypserver server.cluster
# cluster 是你的 NIS 的 domain ,至於 server.cluster
則是 NIS Server 的主機名稱
|
- 修改密碼驗證的方式:
密碼驗證的方式是一定要修改的,不然你的系統怎麼知道要去哪裡使用什麼方式查尋帳號、密碼資料呢?
1. 密碼檔的修改:
[root@client root]# vi /etc/passwd
# 這個檔案總共有七個欄位,而每個欄位都以分號『:』隔開。
# 由於我們要將資料 設定以 NIS Server
的資料庫來驗證,因此, 在這個檔案的最後面加入這一行:
+::::::
# 注意喔!在 + 之後連續加六個『 : 』,並且中間沒有空白字元!
2. 查尋密碼的程序:
# 因為我們有很多方式來查尋密碼,需要修改 /etc/nsswitch.conf 這個檔案才行
[root@client root]# vi /etc/nsswitch.conf
# 找到相關的參數,並改成底下這樣:
passwd: files nis nisplus
shadow: files nis nisplus
group: files nis nisplus
hosts: files nis dns
# 這個檔案在設定一些資訊的查尋程序!那個 files 指的是本機的相關檔案,
至於 nis 則是透過 NIS 來進行查尋, 至於
nisplus 則是透過 NISplus 來進行查尋
# 1. passwd: 就是使用者相關資訊查尋,分別為 /etc/passwd, nis 與 nisplus
# 2. shadow: 就是使用者密碼的查尋, /etc/shadow, nis 及 nisplus
# 3. group: 就是使用者的群組資訊查尋, /etc/group, nis 及 nisplus
# 4. hosts: 就是主機名稱與IP對應的查尋,/etc/hosts, nis 及 /etc/resolv.conf |
nisplus 即是 NIS+, 這是比較新版的 NIS !
- 啟動 ypbind 與設定開機啟動:
NIS Client 也需要啟動 ypbind 這個 daemon ,所以就啟動他吧!
1. 直接手動啟動 ypbind 吧:
[root@client root]# /etc/rc.d/init.d/ypbind start
[root@client root]# rpcinfo -p localhost
program vers proto port
100000 2 tcp 111 portmapper
100000 2 udp 111 portmapper
100007 2 udp 735 ypbind
100007 1 udp 735 ypbind
100007 2 tcp 738 ypbind
100007 1 tcp 738 ypbind
# 至少要有上面幾個資訊才是對的!那個 port number
是系統隨機啟動的,所以 port number 每次都會不太一樣!
# 可用 rpcinfo 去檢查一下 RPC 相關的服務!
2. 設定開機時啟動:
[root@client root]# chkconfig --level 35 ypbind on
|
NIC Client 端檢驗 NIS 設定:yptest, ypwhich,
ypcat
設定好了 NIS Client 之後,先以 netstat 與 rpcinfo 檢驗一下是否成功的啟動之後,接下來就是要測試到底我們的 NIS Client
與 NIS Server 之間溝通的情況!此時就需要使用到 NIS 提供的 yp-tools 這個套件,裡面的幾個執行程式來動作:
- yptest :主要在測試 yp 的設定內容、資料庫內容等等所有 NIS
相關的資料測試;
- ypwhich:主要在測試 NIS Client 與 Server
之間溝通的資料庫 (database) 到底是哪幾個檔案;
- ypcat :主要在取得 NIS Server 上面的使用者密碼資訊!
yptest
[root@client root]#
yptest
Test 1: domainname
Configured domainname is "cluster"
Test 2: ypbind
Used NIS server: server.cluster
....
....
Test 8: yp_maplist
rpc.bynumber
rpc.byname
hosts.byaddr
hosts.byname
group.byname
passwd.byname
ypservers
passwd.byuid
Test 9: yp_all
test
test:dkoUW2XHV30sEV5gLM4NapyuhBcpVs.:500:500::/home/test:/bin/bash
|
會有很多的資料一項一項的去測試,測試的結果都會顯示在螢幕上面. 剛架設好 NIS Client 時,可使用 yptest
去檢查看看有沒有設定錯誤!根據螢幕顯示的訊息去一個一個校正錯誤!
ypwhich
[root@client root]#
ypwhich
server.cluster
[root@clent root]# ypwhich -x
Use "ethers" for map "ethers.byname"
Use "aliases" for map "mail.aliases"
Use "services" for map "services.byname"
Use "protocols" for map "protocols.bynumber"
Use "hosts" for map "hosts.byname"
Use "networks" for map "networks.byaddr"
Use "group" for map "group.byname"
Use "passwd" for map "passwd.byname"
|
單純使用 ypwhich 的時候顯示的是NIS 的 domain名稱,而當加入 -x
這個參數時,則是顯示NIS Client 與 Server 之間溝通的資料庫有哪些?這些資料庫檔案是放置在
NIS Server 的 /var/yp/cluster/* 裡面!
ypcat
[root@client root]#
ypcat -x
Use "ethers" for map "ethers.byname"
Use "aliases" for map "mail.aliases"
Use "services" for map "services.byname"
Use "protocols" for map "protocols.bynumber"
Use "hosts" for map "hosts.byname"
Use "networks" for map "networks.byaddr"
Use "group" for map "group.byname"
Use "passwd" for map "passwd.byname"
# 主要的功能就是列出資料庫!與 ypwhich -x 相同功能!
# 所以我們有 ethers, aliases......passwd 等資料庫名稱與檔名!
[root@client root]# ypcat [資料庫名稱或功能]
# 這個指令可以用來取得 NIS Server 上面各個資料庫的內容!
# 舉例來說,我們想要知道 passwd ( 密碼資料 ) 的所有使用者內容,就需要:
[root@client root]# ypcat passwd (或 ypcat
passwd.byname )
test:dkoUW2XHV30sEV5gLM4NapyuhBcpVs.:500:500::/home/test:/bin/bash
# 如果是想要知道 hosts 的內容 (NIS Server 主機上面 /etc/hosts 的內容):
[root@client root]# ypcat hosts
127.0.0.1 localhost localhost.localdomain
192.168.10.30 server.cluster
# 反正就是加上資料庫,你就可以取得 NIS server 主機上面的資料庫內容!
|
修改使用者密碼 ( 需要有 root 身份 ): yppasswd, ypchfn,
ypchsh
能不能在 NIS Client 端修改各個帳號的密碼呢?答案是『能!』但是不怎麼方便∼因為,我們要修改的是
NIS Server 端的資料庫!也就是說,我們在 NIS Client 端登入之後,要修改自己這個帳號的密碼,其實改到的是 NIS Server
的資料庫密碼!而要修改資料庫密碼時,需要使用 root 的身份,可以使用底下三個小指令來進行修改!
- yppasswd :與 passwd 指令相同功能;
- ypchfn :與 chfn 相同功能;
- ypchsh :與 chsh 相同功能。
不太建議大家使用這些指令去修改資料庫的內容!比較建議這樣做:
- 登入到 NIS Server 主機裡面去,進行 useradd 或者是 passwd
修改帳號與密碼等等的更動;
- 使用 /usr/lib/yp/ypinit -m 重新製作資料庫檔案!
主機進階設定
延伸閱讀:
1. 完整的NIS資料: http://www.linux-nis.org/